12 June 2026.
Why did I decide to enter this contest? I have no idea. At my age, I should be sitting on my veranda sipping coffee, reading the newspaper, and enjoying my retirement.
Maybe it is because I am a modeller. I love building kits; it is therapeutic and keeps my 70-year-old mind and fingers nimble.
Maybe it is because I want to inspire the younger generation—a generation too tied to their mobile devices and social media.
Maybe it is because I want to show older modellers that age is not a hindrance to the hobby.
Maybe it is because this incredible hobby deserves to live on, and not be driven into oblivion by computer games and other screen delights.
Maybe it is because I like a challenge—especially if it involves my favourite hobby.
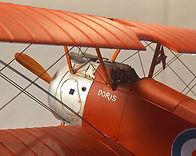
I have entered the Military category, and I will be building the fabulous Sopwith Camel F1 fighter from the First World War. In particular, the aircraft I will be building is the red Camel of Captain D’Urban Victor Armstrong. More about him later.
The kit I will be building is the Academy 1/32 scale Sopwith Camel F.1. I am posting two initial photos to prove the model is currently unbuilt. In the background, you can see a local newspaper displaying today's date: 12 June 2026.
16 June 2026.
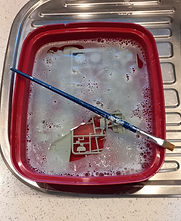
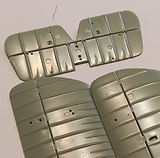
First step - clean the model. Although plastic kits are cleaned after the injection process, sometimes the release agent used in the process lingers on. I always wash the plastics in a dishwasher solution, brushing the parts with a soft nylon-haired artist's brush. Release agent on the plastic can sometime cause problems, like paint not coming on properly, or glue not sticking as it should.


19 June 2026
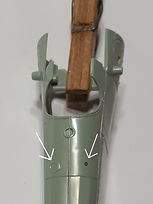
I have in the past had a terrible Academy kit, but I must say this Sopwith Camel kit is not bad at all. All the parts are crisp and there’s hardly any flash. However, the die tool ejection marks are prominent and in areas that are highly visible. Some can be fixed, some, like on the inside of the wheels, are a problem. There are also some errors on the kit itself. The main fuel tank filler cap is on the wrong side of the fuselage. On the inside of the cockpit area the throttle quadrant is on the wrong side. The two carburettor intakes on either side of the cockpit are way out of scale. The cockpit floor is not realistic and will have to be altered quite a lot. I have finally got to a stage where I have given the whole model a good coat of primer. I have used Tamiya’s ‘Fine Surface Primer’. I used white as it is a better base for the overall red that I am going to spray later.


4 July 2026
What a week I have had. My wife is in hospital with a knee replacement, so everything that happens in the household is being done by ‘yours truly’. So I have not had much time to work on the Camel. However, I have finished off the cockpit area and the next step is the assembly of the fuselage halves. I did come across a huge, glaring fault in the model. The instrument panel, if mounted in it’s locating sockets, is set too far towards the pilot by a good 4.5mm! To place it at it’s correct position necessitates some cutting off of the panel’s top edges. This will be done when I assemble the fuselage.


26 June 2026
The cockpit is the first area I need to address. The models’ interior is not great so I needed to do a lot of scratch building. I visited all my reference photos and discovered that there is no definitive Camel cockpit - so I will use modeller’s license to build it. The chair that the model comes with is horrible, so I made my own. The cockpit floor had to be remodelled. I added control cables and other detail. The dashboard just had to be changed. I spent close on three days just on the dials and other detail on the dashboard. The cockpit is not quite finished yet, but it is close. Then I can carry on with other things on the plane.


11 July 2026
Once again, with my wife not home I am kept fairly busy at home. However, I did manage to get paint onto the model. I discovered, quite by accident, that the decal sheet is not all that good and the decals are fragmenting! Besides that, to apply decals to a wing surface like the Camel’s is a mission in itself. I have seen many videos, and it seems no one can really get that decal down on those wing ribs absolutely successfully. So I decided I will paint them on. The masking itself took me the best part of a day. I am fortunate in having the best airbrush I have ever owned – the GAAHLERI GHAD-39 – and it’s not just because GAAHLERI are doing the competition – it truly is a fine tool. The colours for the roundals are self explanatory, but I mixed the blue using ATOM Prussian Blue and Matt Black. Being an artist I managed to get the recipe right by checking it against the decal roundals. Next step – assembling the fuselage/cockpit assemblies and the necessary ‘bracing wires’.



18 July 2026.
At last the fuselage halves are together – but not without problems! Firstly; the bottom of the fuselage should be flat – it isn’t – it is bowed inward to such an extent that I had to fit a complete new flat bottom made out of plasticard. Secondly; the seam at the top of the fuselage is problematic and it took much time to get it as I wanted it, and it is still not perfect. Thirdly; the bunch of bracing wires are constantly in the way.
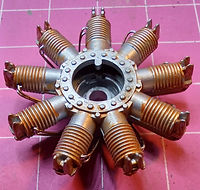
I have started with the engine. Here again I hit numerous problems. The cylinders did not match up on the two halves – close but not to my liking. The exhaust manifold did not line up with the exhaust ports at the cylinder heads, so I had to do some surgery to the locating slots. I have added plug leads as well, as they are rather prominent on the real engine. The front part of the engine assembly holds the push-rod sleeves – these are grossly out of scale and I will have to replace them with much thinner rods. I have added the normal weathering to the engine, but still much time has to be spent on this radial motor.


24 July 2026
The front part of the engine that holds the push-rods had to be modified, so I amputated all the push-rods leaving only the central hub. I then drilled 18 holes into this hub, staggered as they were on the real engine. I then got hold of a length of old sprue and stretched it over a candle (old school, but it works). I managed to get some sprue down to 0.4mm diameter; this equates to about 13mm diameter on the real engine. I then started fitting and gluing down the 18 push-rods – no one told me it would be this difficult! But I am now qualified to do micro-surgery!
26 July 2026.
Whenever I work on models my mug of coffee is not far away – things do go better with coffee. Oh, and by the way, in the background you can see my other major project; a 1:32 scale Hawker Hunter of the Rhodesian Air Force. That needs to be completed by the end of October. In the meantime, it’s time to get the propeller done. Fortunately, because I am actually a professional artist, I have all the right colour acrylics. Beginning with the lightest colour I did a wood finish on the prop, ending off with a darker Burnt Umber. I finished it off with a clear gloss coat. This particular aircraft was unusual in that it actually had a spinner on the propeller hub. I found a dowel of the right diameter, fitted it to my Black & Decker drill and turned a pretty reasonable spinner, which I sprayed silver.


2 August 2026.
Slowly but surely the Camel is coming together. It was time to do the roundels and writing on the fuselage. Here is my biggest gripe with Academy; their decals. Why do they have each element of the roundel separate; the outer white circle, the blue/white circle and the red dot in the middle are all separate decals? Why do they not just go to the trouble and register their print colours properly like all the other manufacturers? Besides that, the decals came apart as I applied them, and I had to do some painting to get them right. The outer white circle I had to paint on. The number on the tail, the No. 1 on the fuselage, and the unique ‘DORIS’ on the side of the cockpit, I also painted on. Finally the engine cowl is on, and the lower wing. Regarding the rigging – I happened to see another built Academy Camel over the weekend and it seems the rigging thread that Academy supplies with the kit is not the best, looks like it may sag later on, and the appearance is not as good as I expected. I might resort to some other material for the rigging when I get to it.


10 August 2026.
This week has been exceptionally frustrating! I have made two critical promises to myself – firstly; never build a WW1 aircraft again. Secondly; never buy an Academy kit again. This kit came with beautiful plastic mouldings that fitted remarkably well. However – the manufacturers should have paid more attention to research into their subject. Up to now I have found numerous errors that are just inexcusable. But this week I came upon just the worst one! The two Vickers machine-guns are 180 degrees wrong! If I was to mount them as shown in the instructions the would have been ‘up-side-down’. That was not all, their detail was totally wrong, according to reference photos, and I had to do much work on them to get them to look ‘almost’ right. The other problem, which I mentioned before, was the rigging. The thread supplied is not suitable. In scale it would look as if all the bracing wires were frayed. I tried copper wire from electric cables – without success. I tried stretched sprue – without success. I tried a special thin wire that came on a spool – without success. Then I went to my hobby shop and bought 0.3 diameter brass rod – and so far it is working! But the time I spent trying to get this solution may put me out of this competition. I also did some weathering, which turned out okay.



17 August 2026.
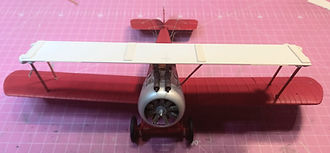
I have completed the rigging of the tail section, and it was not easy – but it is done. I took some time to get the undercarriage assembled, and it is now on the Camel, but without its rigging – that can wait a bit. Now for the MAJOR mission, getting the main rigging between the wings done. This is in fact a huge problem. The instructions have no advice on how to do this, and with the struts configured as they are there is nothing that prevents the top wing from being too far forward, too far back, or skew. After much thought and contemplation I realised that the best way to tackle this assembly is to make a jig so I can mount the struts in the right orientation and angle. (I am working off actual, old, plans of the Camel). Easier said than done! I discovered that at the right position, for the top wing to be accurate, the strut lengths will cause the top wing to bow. So out with my knife and I did some surgery. The struts themselves also revealed another glaring fault. The locating holes on the fuselage, where the inner struts are supposed to fit in, do not work. The locating pins in the struts are moulded at least 90 degrees wrong, they do not fit into the holes at all. Some more surgery! So up to now I have all the struts in position. The next challenge is the actual rigging. Now where did I put my medication?
22 August 2026
Tantalizingly close to completion. The rigging is done! One thing about this hobby of ours – it teaches you patience. The multitude of braces on this Camel took me the best part of two days, and I can see flaws, but it is DONE!
Now it’s a matter of tidying up, patching paint, all the small things that I left till last. There is light at the end of this plastic tunnel!


25 August 2026
At this point I think it is time to give some background and history of this particular Sopwith Camel.
Captain D’Urban Victor Armstrong DFC (1897–1918) was a South African pilot who earned a remarkable reputation as one of the finest pilots of the Sopwith Camel during the First World War.
Born in Durban in 1897 and educated at Hilton College, Armstrong joined the South African Aviation Corps and went to Britain for pilot training. He subsequently served with several Royal Flying Corps and Royal Air Force squadrons, gaining valuable experience both on the Western Front and in Home Defence.
Armstrong was particularly renowned for his extraordinary mastery of the Camel. Fellow pilots regarded him as an exceptional aerobatic pilot, capable of performing spectacular manoeuvres at extremely low altitude. He also became highly proficient in night fighting and was one of the pioneers of Camel operations against German night bombers.
The aircraft represented here is Sopwith Camel F.1 C6713, Armstrong’s personal Camel, which he named Doris. The model depicts the aircraft in its striking overall red finish with standard RFC markings, with the name Doris displayed beside the cockpit.
Armstrong achieved four of his five aerial victories while flying C6713, including victories during night operations. His skill and courage earned him the Distinguished Flying Cross.
Tragically, Armstrong's remarkable career ended only two days after the Armistice. On 13 November 1918, while flying C6713 at Bouvincourt, France, he was killed during a low-level aerobatic manoeuvre. He was just 21 years old.
Armstrong's short career left a lasting impression on those who flew with him. His personal Camel, Doris, therefore represents not only one of the most famous fighters of the Great War, but also the extraordinary skill and courage of a young South African aviator.
I also started, and finished the base for the model display.


27 August 2026
My Sopwith Camel F1 is FINISHED! I believe this is probably the most difficult model I have ever built, it tried my skills and tested my patience, and I must admit there were times I seriously considered giving up. At the start I had in my mind this pristine example of a Camel – and then as I progressed I realised it could never be as good as I had dreamed – and finally, with the finished model before me, I think it turned out better than I could have imagined.
I must at this point thank my Lord and my Saviour Jesus Christ for the talent of craft He has given me, and if this model has any value and virtue in it, I give all the glory to Him.
To all my fellow contestants – I have been amazed at the work I have seen come together, and I am so grateful to realise that this beautiful hobby of ours is far from extinction! To all of you – all the best, and good luck!
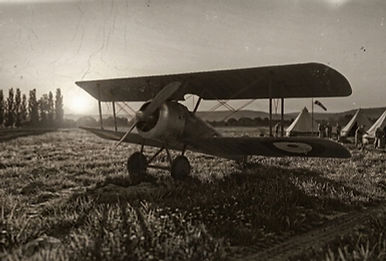
Just to clarify; the black & white photos are of my model – but enhanced by AI. I added them just for interest sake.